API Overview
Introduction
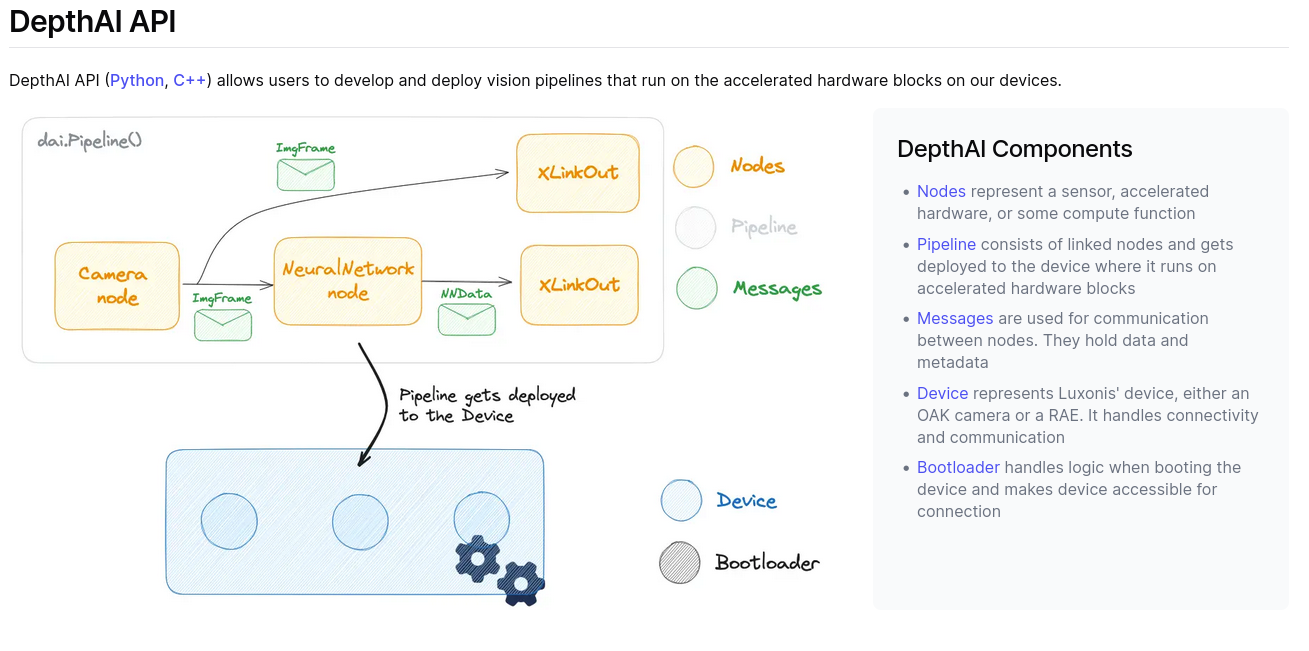
Fig: API overview from official documentation
Interface nodes
There are two nodes that facilitate communication between device (OAK-D) and host (computer). One acts as input to device and other acts as output from device.
This node acts as a output from device. It is used to get frames, NN output, etc.
This node acts as a input to device. It can be used to send CameraControl message to control brightness, exposure, etc. of RGB sensor.
General Program Structure
Create a pipeline
Declare the necessary nodes like MonoCamera, ColorCamera, StereoDepth, XLinkOut, etc. in the pipeline
Define the properties of nodes
Link the nodes i.e. feed input of one node to output of other node
Connect to device(OAK-D) and start pipeline using Context Manager (preferred way)
Set device properties like IR Dot Projector Intensity
Set Input/Output Queues from XLink nodes
Loop infinitely
Simple Example: Depth Preview
# Example: https://docs.luxonis.com/software/depthai/examples/depth_preview/

#!/usr/bin/env python3

import cv2
import depthai as dai
import numpy as np

# Closer-in minimum depth, disparity range is doubled (from 95 to 190):
extended_disparity = False
# Better accuracy for longer distance, fractional disparity 32-levels:
subpixel = False
# Better handling for occlusions:
lr_check = True


## 1. Create pipeline
pipeline = dai.Pipeline()


## 2. Declare the necessary nodes
monoLeft = pipeline.create(dai.node.MonoCamera)
monoRight = pipeline.create(dai.node.MonoCamera)
depth = pipeline.create(dai.node.StereoDepth)
xout = pipeline.create(dai.node.XLinkOut)

xout.setStreamName("disparity")


## 3. Define the properties of nodes
monoLeft.setResolution(dai.MonoCameraProperties.SensorResolution.THE_400_P)
monoLeft.setCamera("left")
monoRight.setResolution(dai.MonoCameraProperties.SensorResolution.THE_400_P)
monoRight.setCamera("right")

# Create a node that will produce the depth map (using disparity output as it's easier to visualize depth this way)
# Options: MEDIAN_OFF, KERNEL_3x3, KERNEL_5x5, KERNEL_7x7 (default)
depth.initialConfig.setMedianFilter(dai.MedianFilter.KERNEL_7x7)
depth.setLeftRightCheck(lr_check)
depth.setExtendedDisparity(extended_disparity)
depth.setSubpixel(subpixel)


## 4. Linking the nodes
monoLeft.out.link(depth.left)
monoRight.out.link(depth.right)
depth.disparity.link(xout.input)


## 5. Connect to device(OAK-D) and start pipeline using Context Manager
with dai.Device(pipeline) as device:


  ## 6. Set device properties
  device.setIrLaserDotProjectorIntensity(1.0)


  ## 7. Set Input/Output Queues from XLink nodes

  # Output queue will be used to get the disparity frames from the outputs defined above
  # Arguments: maxSize=Size of Queue; blocking=False: substitute messages in queue with newer messages
  q = device.getOutputQueue(name="disparity", maxSize=4, blocking=False)


  ## 8. Loop infinitely
  while True:
    inDisparity = q.tryGet()  # non-blocking call

    if inDisparity is None:
      continue

    frame = inDisparity.getFrame()


    # Normalization for better visualization
    frame = (frame * (255 / depth.initialConfig.getMaxDisparity())).astype(np.uint8)

    cv2.imshow("disparity", frame)

    # Available color maps: https://docs.opencv.org/3.4/d3/d50/group__imgproc__colormap.html
    frame = cv2.applyColorMap(frame, cv2.COLORMAP_JET)
    cv2.imshow("disparity_color", frame)

    if cv2.waitKey(1) == ord('q'):
      break
See the pipeline of above code with live FPS count of each input and output: Live Pipeline View